
![RANGER[1].jpg](https://images.squarespace-cdn.com/content/v1/586aa724ebbd1a367d325505/1485144469879-IEPXC3DDNST5F3FXU3QD/RANGER%5B1%5D.jpg)
“A set of wither tracings done correctly, including rider information. ”

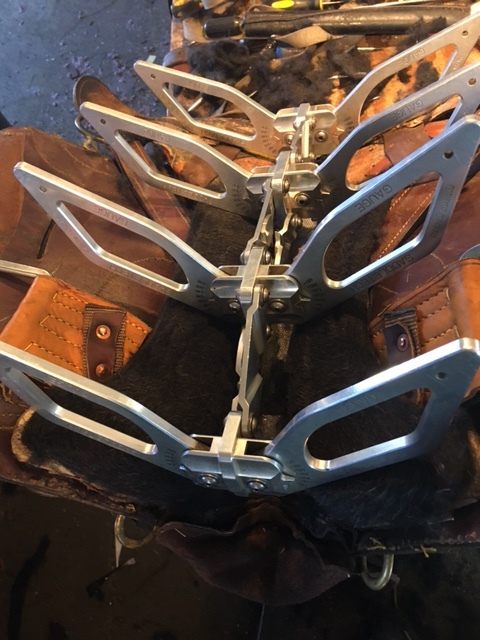
Using a professional saddle gauge to measure a horse. A piece of bendable wire will achieve the same result. The wire is placed to conform to the horse's back, then on a piece of paper where it is traced with a black marker. The wire is placed across the withers where each of the gauge arms are positioned in the picture. The final wire is placed along the spine.
How to trace the withers of a horse:
TRACING THE WITHERS OF THE HORSE IS BOTH EASY -- AND NECESSARY. The tracings tell us what ANGLES are necessary for us to correctly adjust the tree of the saddle to fit the back. Western saddle makers use terms like "full quarter horse tree," "semi quarter" and "half quarter." To us, these terms are meaningless. For starters, quarter horses today look nothing like the quarter horses of 40 years ago, yet these terms are still commonly used. We like actual angles. If you get this right, then we can follow those angles and re-arrange the bottom of any saddle tree so it fits level on the back, and therefore exerts even pressure.
1. Find a piece of wire that will bend easily, but holds its shape. Soldering wire is good, so is a common coat hanger
2. Place this over the withers, where the leading edge of a saddle would fit if the saddle is in the correct position. This leading edge should fit snugly in the "saddle pocket" -- that dip behind the withers. Adjust the wire until it perfectly reflects the shape of the wither. Place this on a sheet of paper and follow the INSIDE line of the wire to make a drawing (Mark this "A")
3. Repeat with positions "B" and "C" , spacing 5 inches in between.
The gauge is set with the wither tracings produced and then the saddle is altered as needed for a perfect fit. It works every time!!

While the gauge is an incredible tool, it must be used by an expert. As Colin explains: "I did a blind study once and had five people go into a closed stall and put the gauge on the same horse, and return the readings to me in a sealed envelope. I ended up with five different readings. Which is why I prefer people to use a simple piece of wire, about 18 long, that will keep its shape. Actual angles are precise. The gauge has too many manipulation possibilities for an amateur."
4. Now lay the wire along the spine of the horse, with the starting point at the point where you placed the wire across the withers. This gives us the "dip," or sway, in the back. Now we know what the saddle should look like laterally.
5. Take a picture of the side-on view of the horse, shown with his head in a normal, alert position, and his back without a saddle. Our trained eyes will confirm what your wire tracings tell us.. We also then enlarge that picture, put it in a special screen and take measurements from it and export those to a saddle gauge.
6. The weight and hands of the horse, and the weight, height, and waist/pant size of the rider.
6. Fax these drawings and the other info to (818) 889-7271 or email the scanned images to TASSC@AOL.COM. You can also place this piece of paper on the ground, take a close up picture with your iPhone, and TEXT those to 818 309-8125.
We then take your FAXES or iPhone transmissions, make cardboard cutouts, set the gauge, and duplicate the back of your horse. We manipulate the tree using equipment capable of reproducing precise angles. Beware of people who say they can manipulate trees using bottle jacks! (Yeah, I can also pull my own teeth with a pair of pliers!) Ultimately what counts most, fitting saddles to horses, is experience. I have been fitting saddles to horses for over half a century. Over 10,000 saddles directly fitted to horses and mules, and 86,000 custom saddle fitting consultations to date.
There is also a lot of nonsense about the leading edge of a saddle -- ANY SADDLE -- impeding the movement of a horse. This conversation is particularly loud from people with gaited horses. Truth is, the scapular is so strong it will move back saddlery -- unless it is heavily anchored down with an impossibly tight breastplate. The scapular moves the same on EVERY horse.
Re-shaping stuffed panel saddles requires a different approach. Often the trees must be re-shaped, but the final fit is achieved by reworking the stuffing, which is usually wool shavings, or horse hair.
Information is the key -- and you can't give us too much of it!
The standard cost for a standard adjustment is $200. But often when we get inside a saddle that has been ridden for 10 or 20 years we find other problems that need to be fixed. We will let you know!
In five percent of custom fittings that we do we need to take a second shot at the fitting, invariably because there were errors in the withers tracing. In this case, we do the work at no charge, but you pay additional shipping. Always a direct conversation is desirable so we can take advantage of the fact you have the saddle on a horse that is at the end of one arm, and a cell phone attached to the other!
History has been made.
A saddle gauge is now available to precisely measure the horse, and can thus be used to precisely measure the saddle the horse will wear! The inventor is Robert Ferrand, a true genius in his own right, with some 25 patents to his credit. Ferrand was a late starter in the horse world and being a novice rider, but an eminent engineer, was astonished that there was no accurate way to measure a horse’s back. He started with computers—his home territory—but ended up with a "low-tech" solution to a high-volume problem. Interestingly, his choice of saddlery, as a trail rider, was the Australian stock saddle. As he says: "Of all the equipment used on horses by trail riders, this made the most sense. I could not understand why everybody who rode trails, and cares for their horse, and their own safety, did not ride Australian. From an engineering point-of-view, and from a rider’s point-of-view, it is brilliant." Colin Dangaard worked directly with Robert Ferrand through various stages of development that resulted in this remarkable instrument, the first of its kind. To save the expense and time of shipping gauges, we have developed a technique of wire tracings. See instructions. It is simple and easy. You FAX us the tracings from A through D. We make a template from these tracings, place them in the Ferrand gauge, and then we can accurately reproduce the back of the horse as it relates to the underside of the saddle.